
Lidia Commerce Documentation
In this guide, you will learn how to create feeds to transfer products from Lidia PIM to external platforms, configure feed settings, and map product fields to external output fields.
Feed management allows you to prepare product data in Lidia PIM in the formats expected by different platforms.
This allows you to share your products with marketplaces, advertising platforms, integration services, or other external systems through a single connection.
A properly configured feed ensures that product information is transferred according to the field structure expected by the target platform and eliminates the need for manual data preparation.
 What Is a Feed and What Is It Used For?
A feed is a data output that transfers product information stored in Lidia PIM to external systems in a specific format.
When you create a feed, the system prepares the selected product information according to the field structure you define and generates a unique URL.
You can share this URL with external systems that need to retrieve product data. Through this URL, the external system can access information such as product name, brand, category, price, inventory, technical properties, and images in the specified format.
A ceramics and building materials manufacturer can share a feed URL with architecture offices instead of continuously sending product catalogs by email. When product information changes, the data available through the feed is updated without requiring the files to be sent again.
This allows product data to be managed from a single source and shared with different systems in a consistent and up-to-date way.
Which Feed Formats Are Supported?
Lidia PIM provides three configuration options when creating a feed:
The selected format determines which fields are included in the product data and how the data is structured when transferred to the external system.
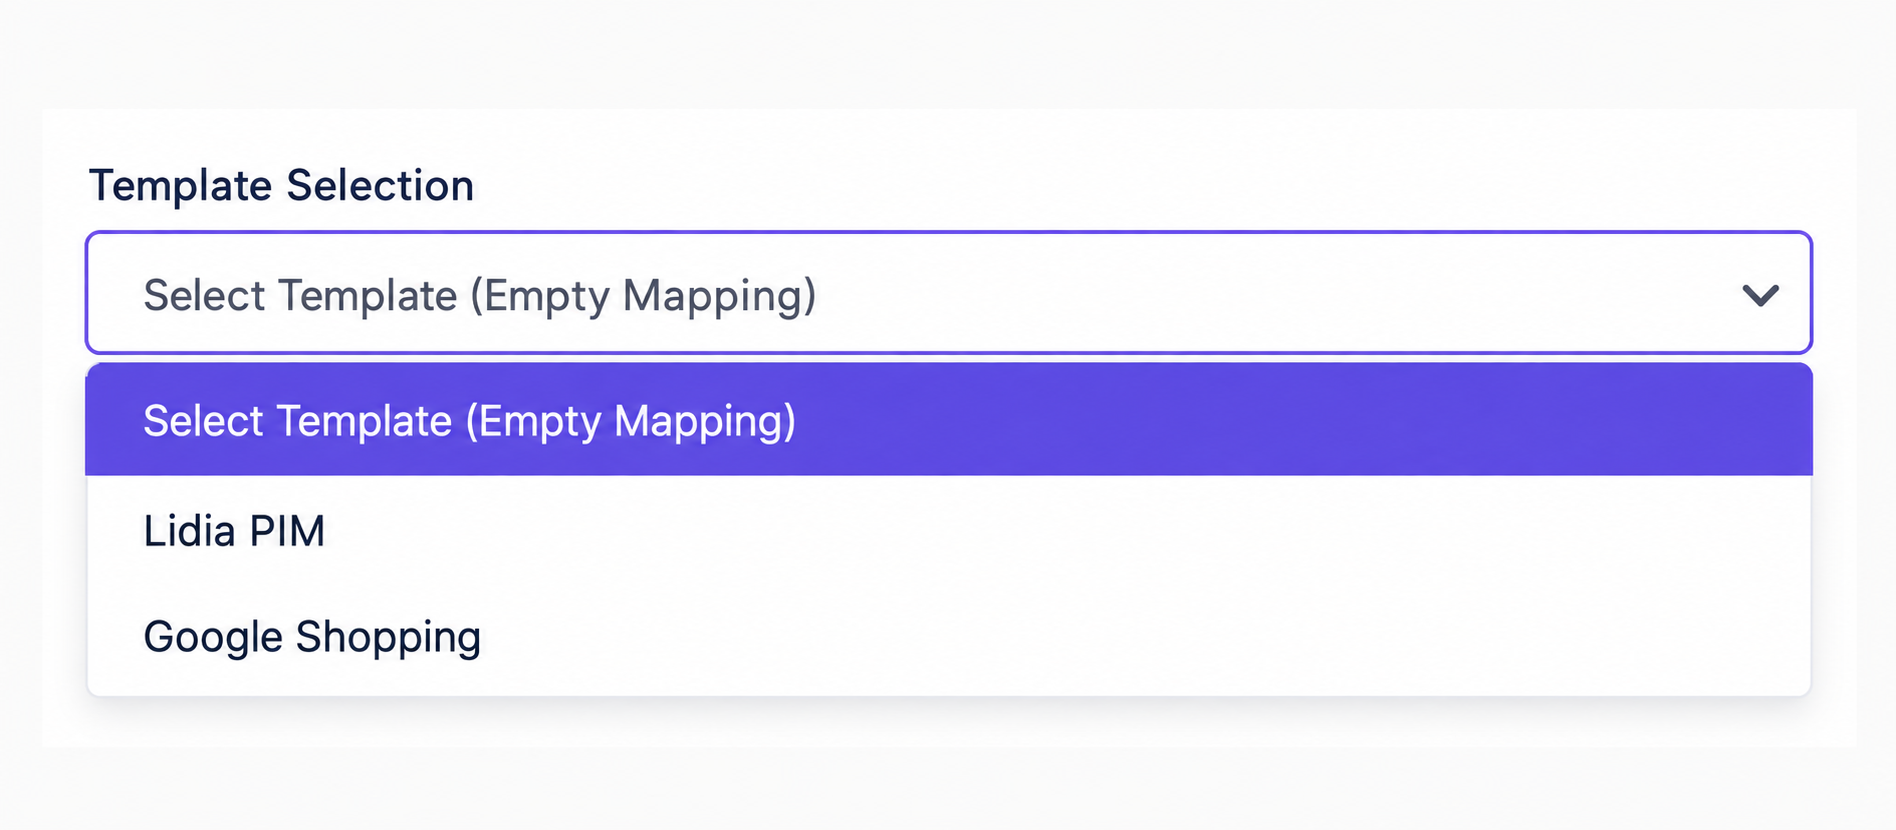 1. Google Shopping Format

Template: Google Merchant XML RSS 2.0
Google Shopping Format is a predefined feed template prepared according to the XML structure expected by Google Merchant Center.
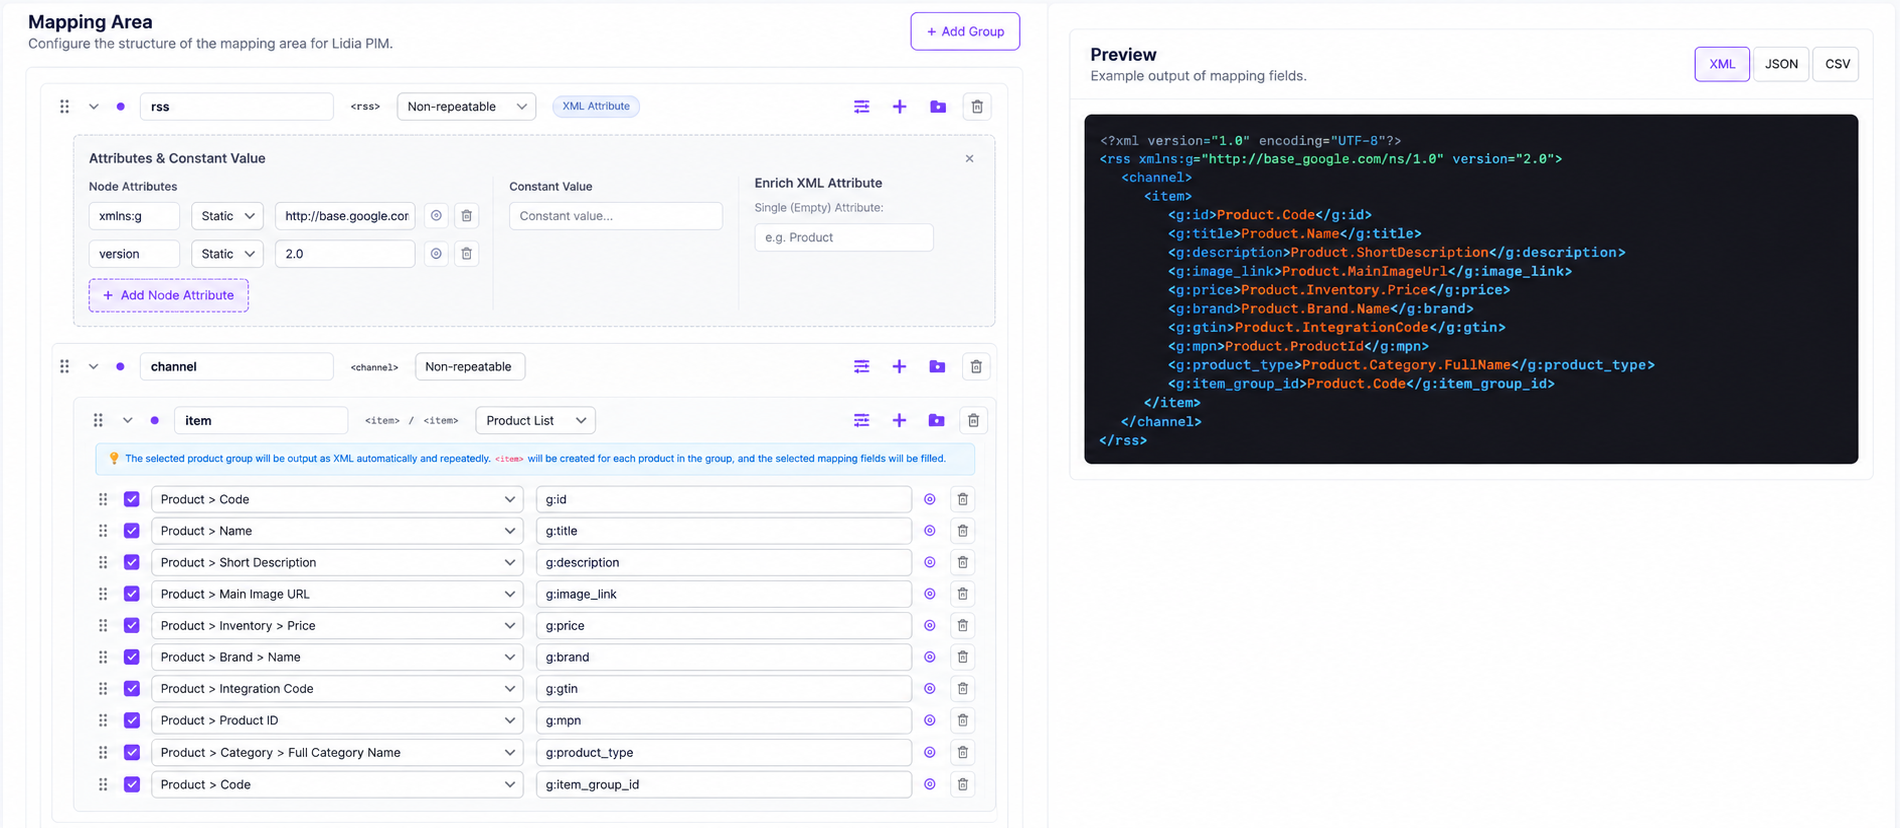
When this format is selected, the system automatically creates the required XML structure and basic field mappings for Google Shopping. Instead of creating the XML structure from scratch, you can modify the predefined structure according to your needs.
The predefined template consists of three main sections:
The rss group is located at the top level of the feed and is created as a Non-Repeating group by default.
This is because the rss tag must be created only once
in the XML output.
The RSS group also includes the predefined Attributes & Default Values area.
This area is used to define Node Attributes and default values that will be added to the XML tag.
These values are automatically added by the system according to the Google Shopping XML standard.
If required, you can customize these values:
These values are not retrieved from Lidia PIM system fields. They are static values written directly into the XML structure and can be freely edited by the user.
The channel group is located under the RSS group and is created as a Non-Repeating group by default.
It is generated only once in the XML output and serves as the parent container for the product list.
New fields or subgroups can be added to the channel group if needed.
The item group is located under the channel group and is created as a Product List by default.
With this structure, a separate <item> tag
is generated for every product included in the feed.
Product fields are defined under this group and automatically repeated for each product.
The predefined Google Shopping template includes mappings for product name, description, product URL, main image, price, brand, integration code, and other basic fields used by Google Shopping.
Existing mappings can be edited, new fields can be added, or unused fields can be removed.
When a repeating group such as Product List is used,
the system automatically creates the XML container and item structure.
If the group name is item, the outer container is
<items> and each record is generated as
<item>.
The automatically generated Container and Item tag names can also be customized according to the XML structure expected by the target system.
Required fields for Google Shopping integration are protected by the system. These fields appear locked in the interface and cannot be deleted or disabled.
 2. Lidia PIM Format
.png)
Template: Lidia PIM
Lidia PIM Format is a predefined feed template designed to transfer all product data available in Lidia PIM to external systems.
When this format is selected, the feed structure and field mappings are automatically created by the system.
All groups, subgroups, and field structures are predefined, but the user can modify the structure if needed.
The predefined template includes the following structure:
<product> tag inside
<products>.
<variant> tag inside
<variants>.
<products> / <product>
<variants> / <variant>
<pictures> / <picture>
<documents> / <document>
<categories> / <category>
<trademarks> / <trademark>
<properties> / <property>
<options> / <option>
With this structure, products, variants, and all related data can be transferred hierarchically within a single feed.
To list all variants of a product, a subgroup of type Variant List must exist under the product group. Individual variant fields such as Variant Code or Variant Status added directly under a Product or Non-Repeating group do not list all variants; they return only the first variant of the related product.
For this reason, the predefined Lidia PIM Format is structured with a Variant List under the product group.
 3. Manual Configuration
When Manual Configuration is selected, the Mapping Area is created empty.
In this method, the groups, subgroups, and fields included in the feed are completely determined by the user.
Because no predefined template is used, the feed structure must be created from scratch.
First, use Add Group to create the main group, then add the required subgroups and fields.
This option is suitable for users who want to create a fully customized feed instead of using the predefined Lidia PIM or Google Shopping templates.
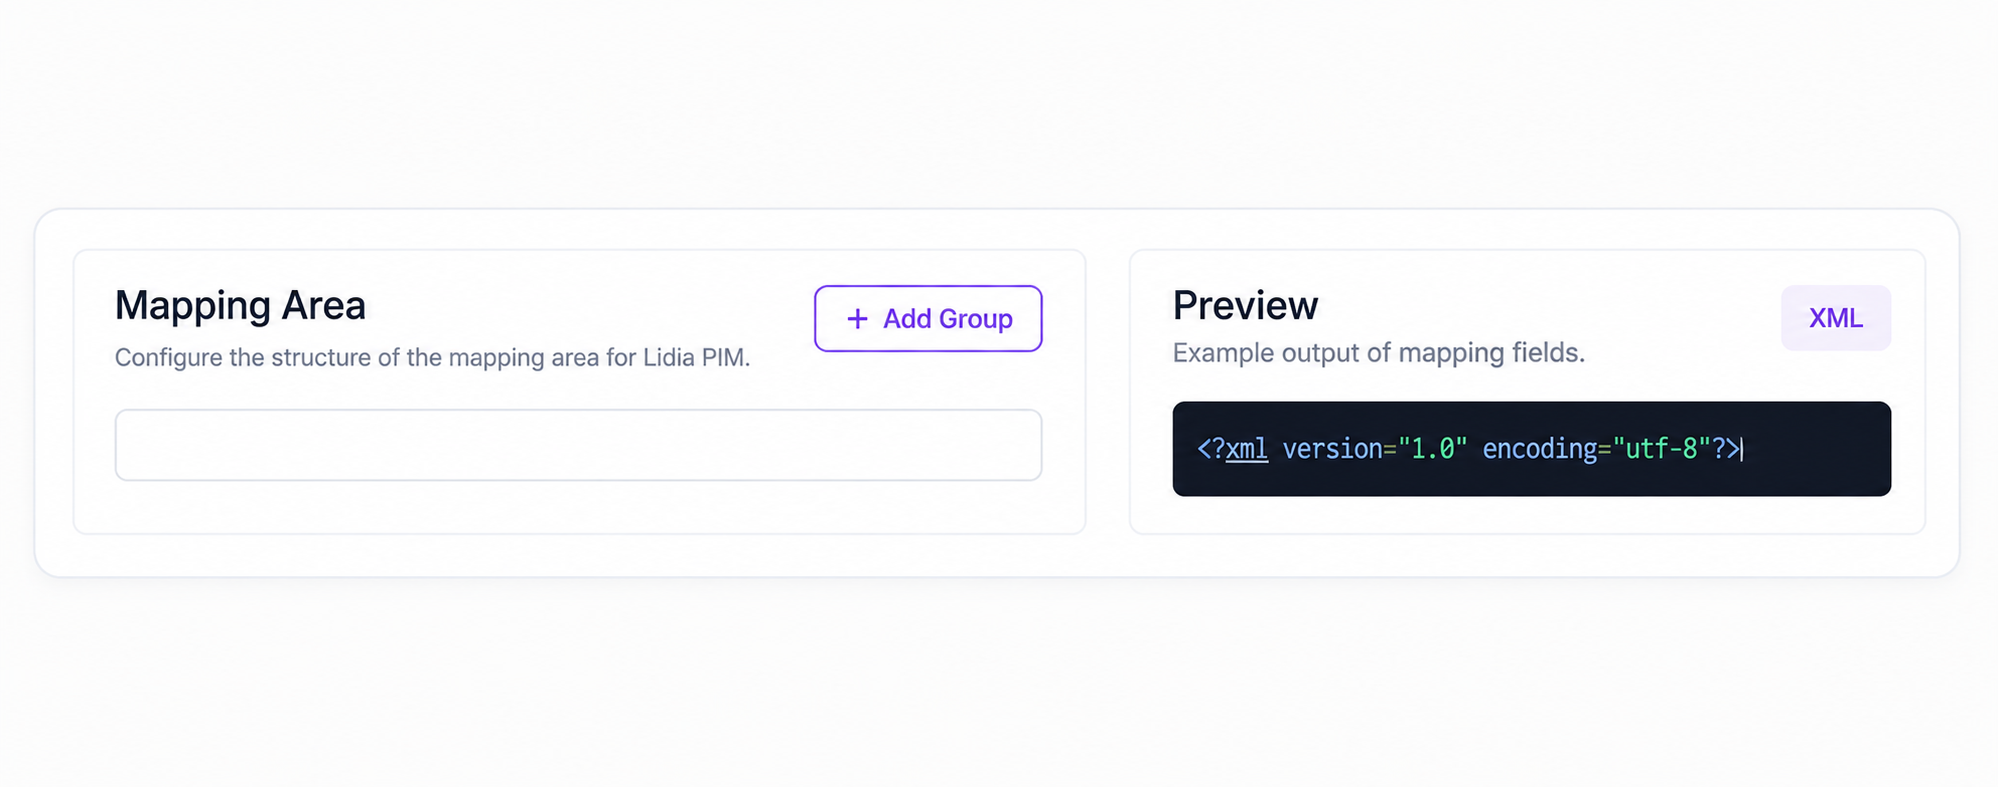
The Mapping Area is used to create the grouped data structure, while the Preview panel displays how the configured mapping will appear in the generated output.
How to Create a New Feed?
Click Add New Feed.
In the opened modal, configure:

Click Continue.
After creation, the system redirects you to the feed detail page, where you can configure feed settings and field mappings.
Access permissions for every created feed can be managed through Access Control. This ensures that only authorized users or systems can use the feed URL.
How to Configure Feed Settings?
After creating a feed, you can manage how it operates from the feed detail page.
You can configure access settings, customize output behavior, filter the data included in the feed, and configure field mappings.
These operations are managed through:
The Basic Information section is used to manage the feed identity, sharing links, and security settings.
From this section, you can:
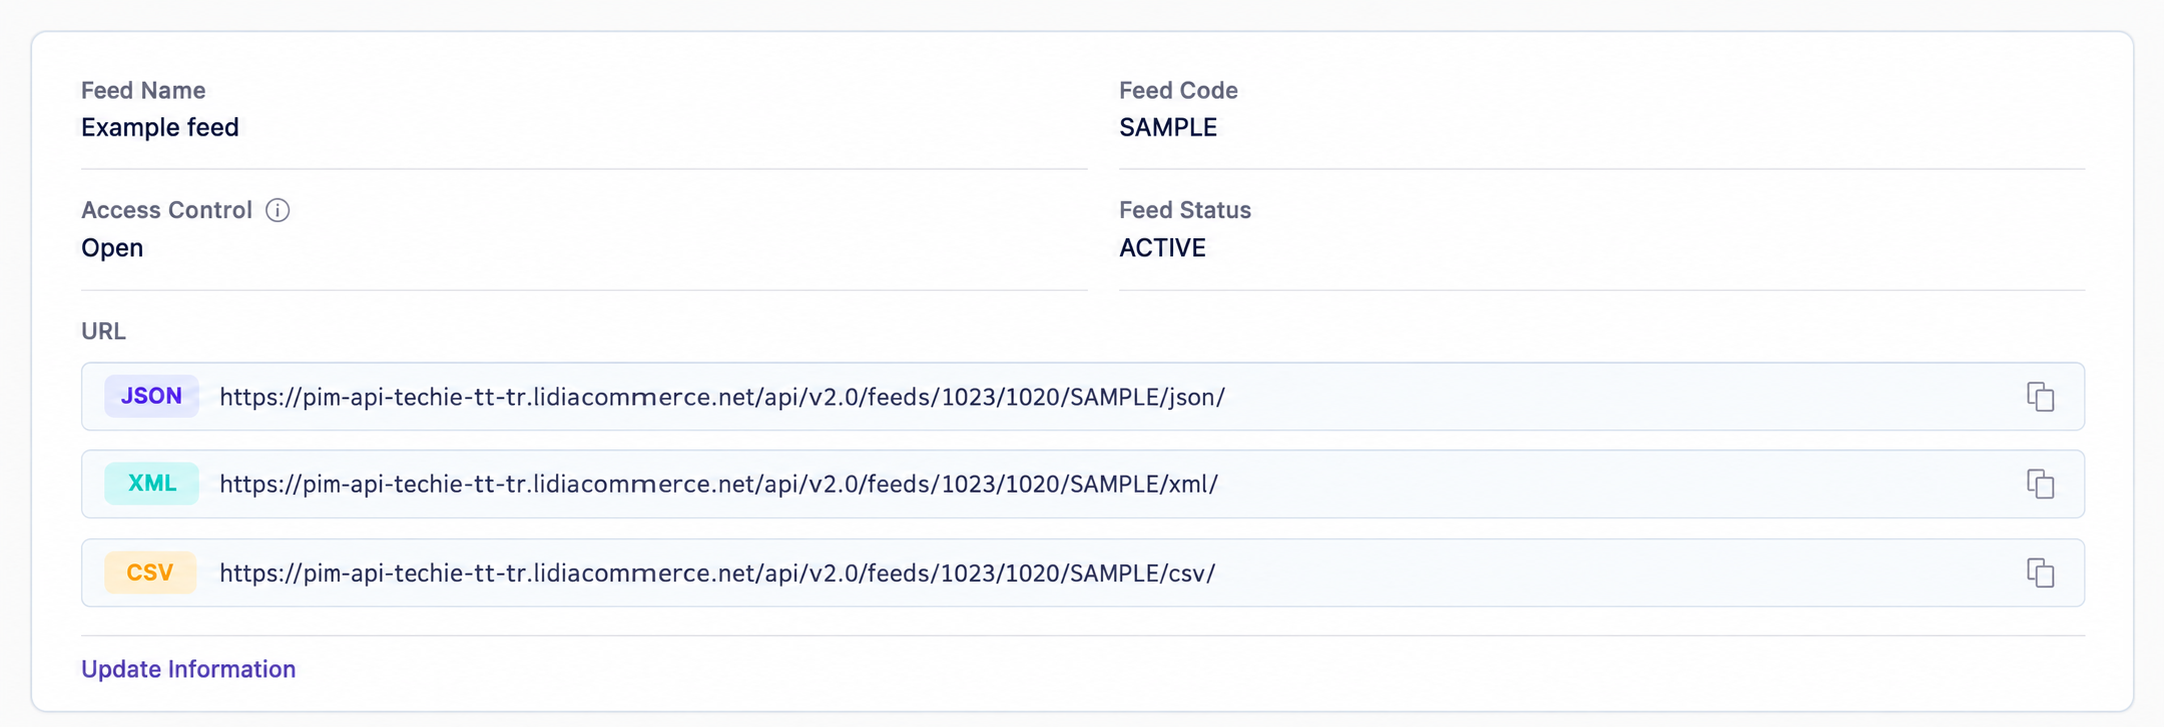
The system automatically creates sharing URLs in JSON, XML, and CSV formats for every feed.
Use the Copy button next to each URL to copy the link and share it with the integration system.
JSON, XML, and CSV URLs contain the same feed data. The only difference is the output format used to present the data to the external system.
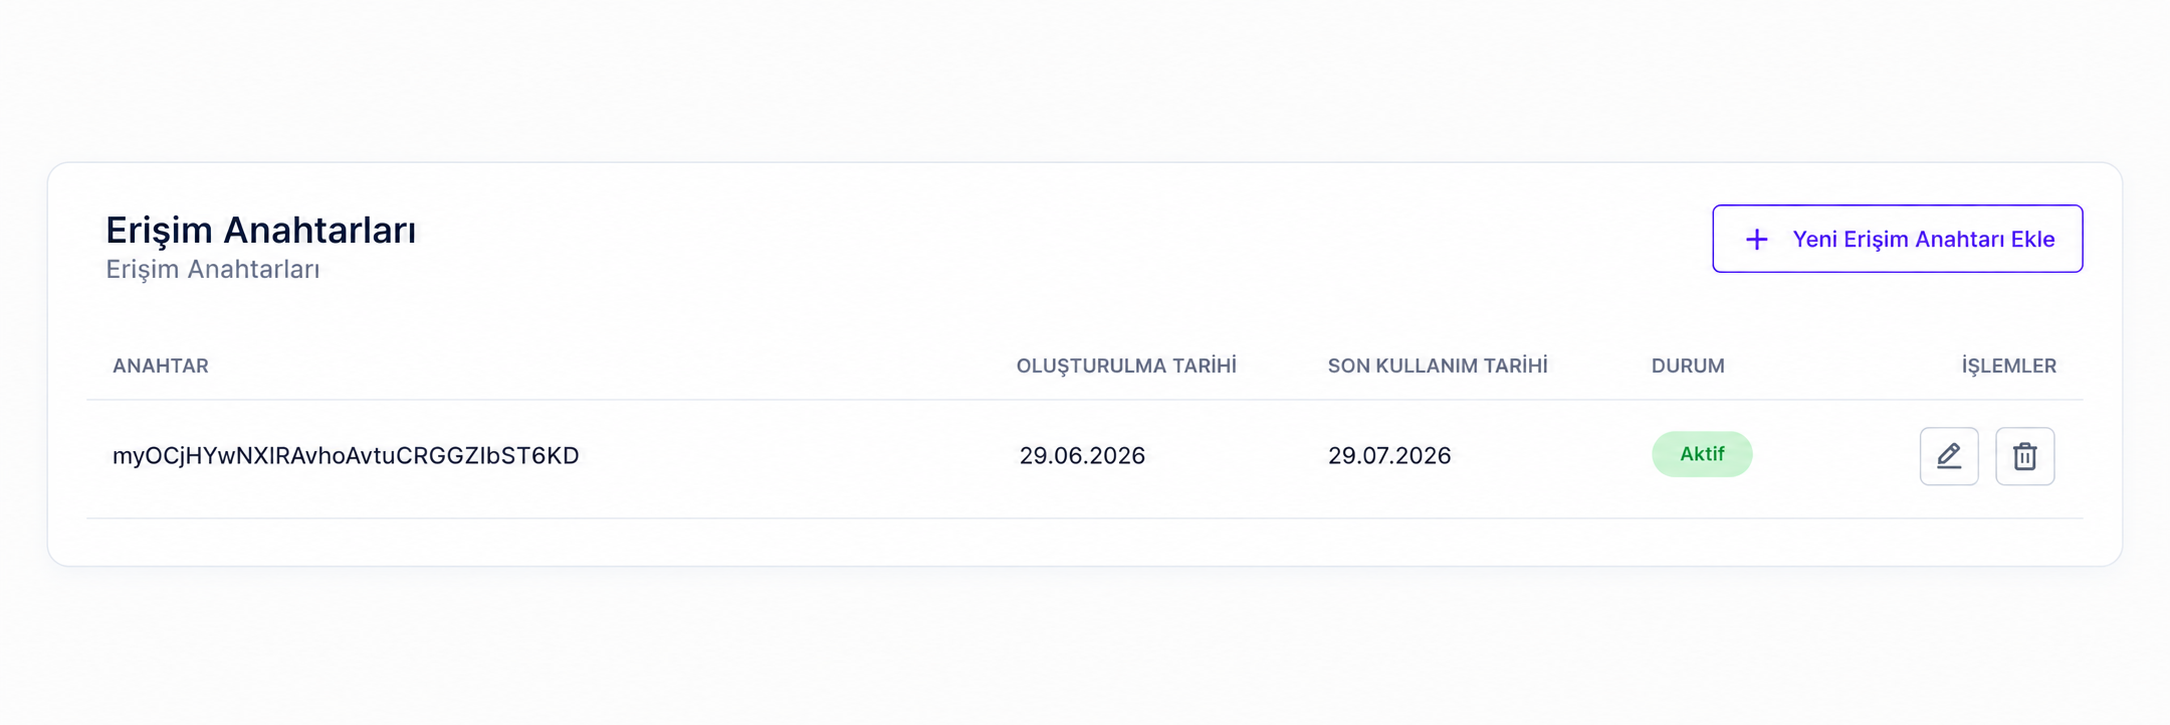
Use Add New Access Key to create keys that can be used to securely access the feed URL.
Multiple access keys can be created for a single feed. This allows you to create separate keys for different external systems or business partners and manage their access independently.
The Feed Settings section determines how the feed is generated, which data is included, and which data processing rules are applied to the output.
Output Settings determine the rules used to generate the JSON, XML, and CSV outputs.
When GZIP Compression is enabled, the output file is compressed using the GZIP algorithm.
This option can be used when large data sets need to be shared in a smaller file size.

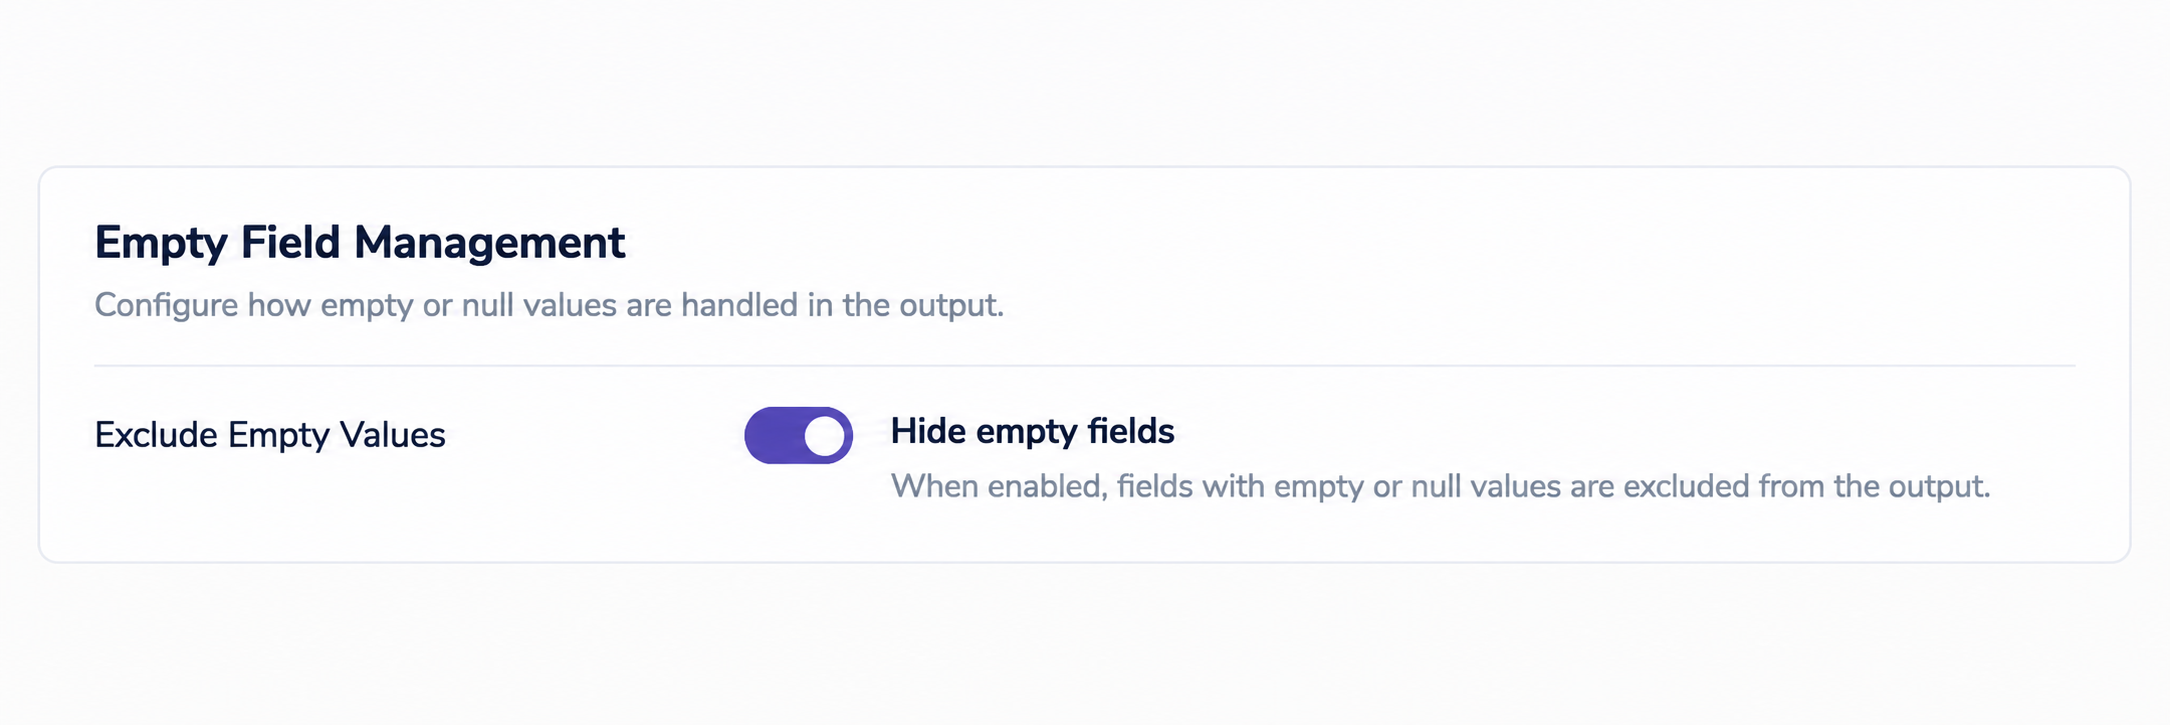
This section determines how empty or null values are handled in the feed output.
When Exclude Empty Values is enabled, fields containing empty or null values are not included in the generated feed output.
This section automatically removes unnecessary spaces from text fields.
When Trim is enabled, unnecessary whitespace characters at the beginning and end of text values are removed.

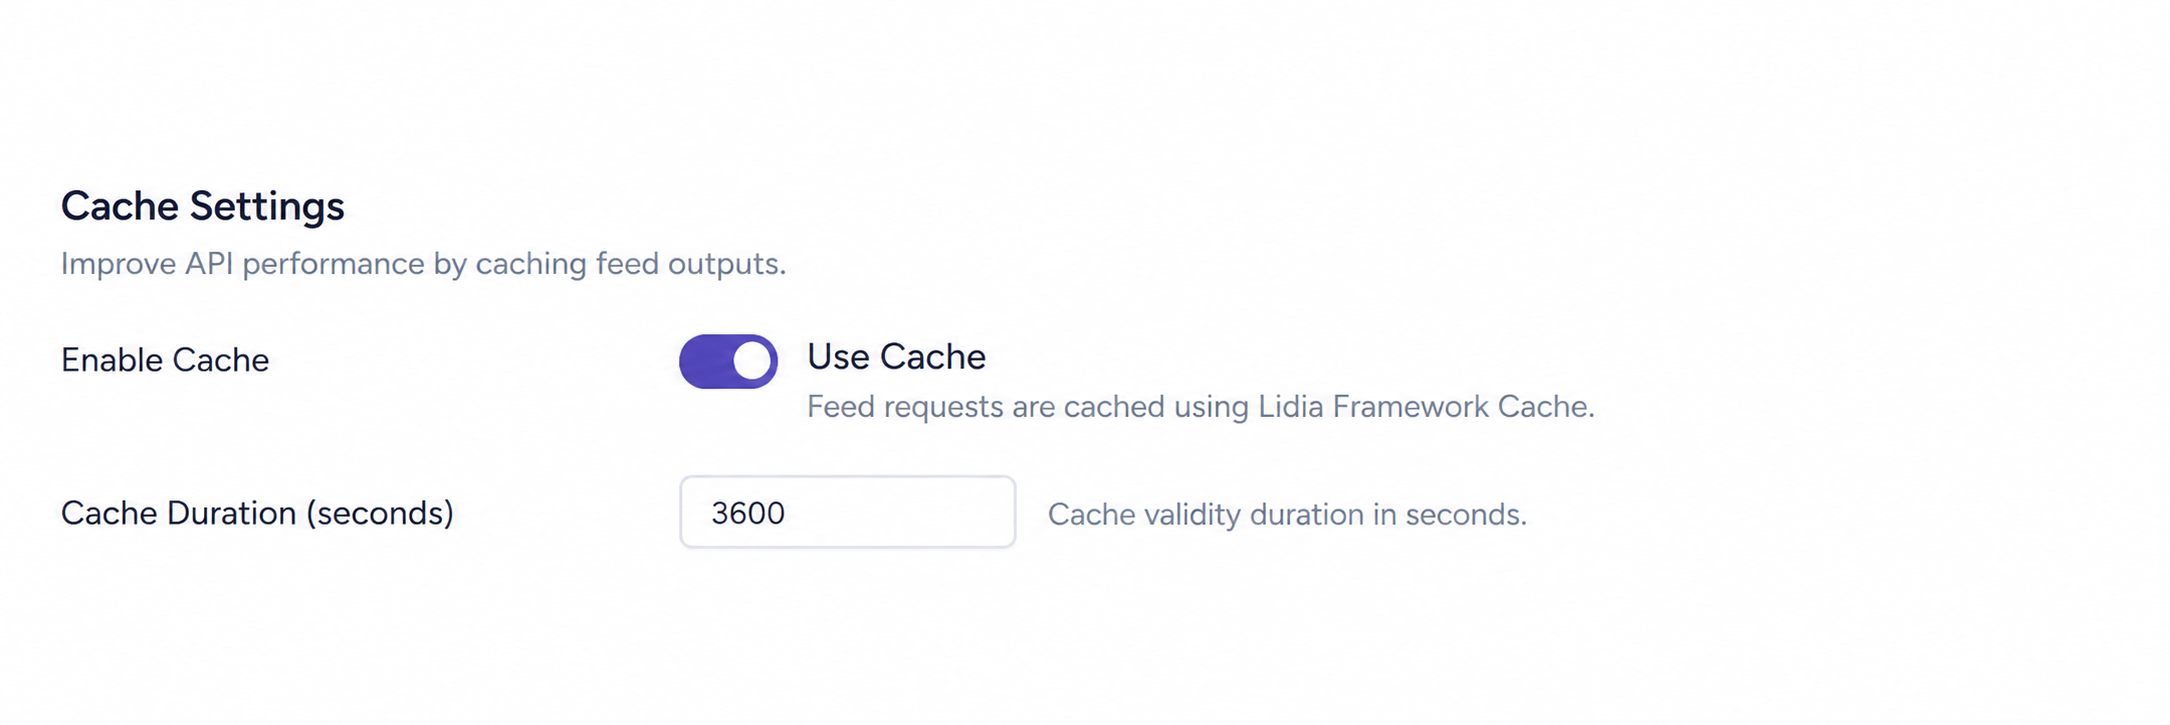
Feed outputs can be cached to improve response performance.
When Use Cache is enabled, the system stores the generated feed output in cache. When the same feed is requested again, the cached output is returned instead of generating it again.
Use Duration (seconds) to define how long the cache remains valid. For example, a value of 3600 means that the feed output is cached for 3600 seconds.
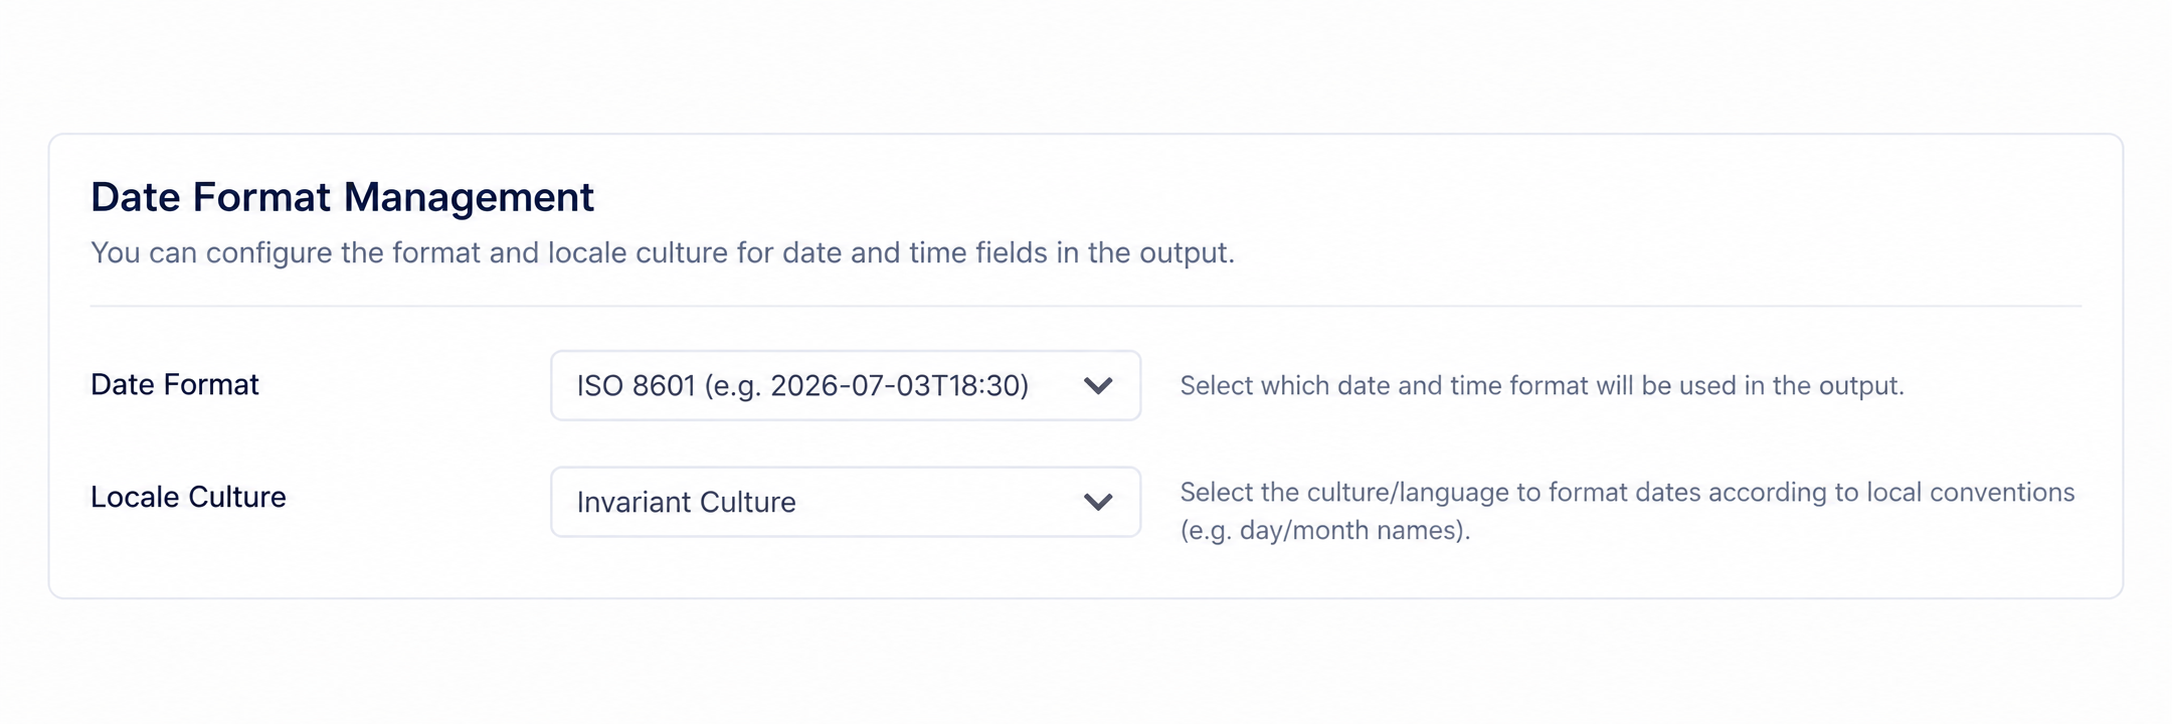
This section determines how date and time information is transferred to external systems.
Date format and locale culture work together. If the target system expects a specific date standard or regional formatting, select the appropriate format and culture to make the feed output compatible.
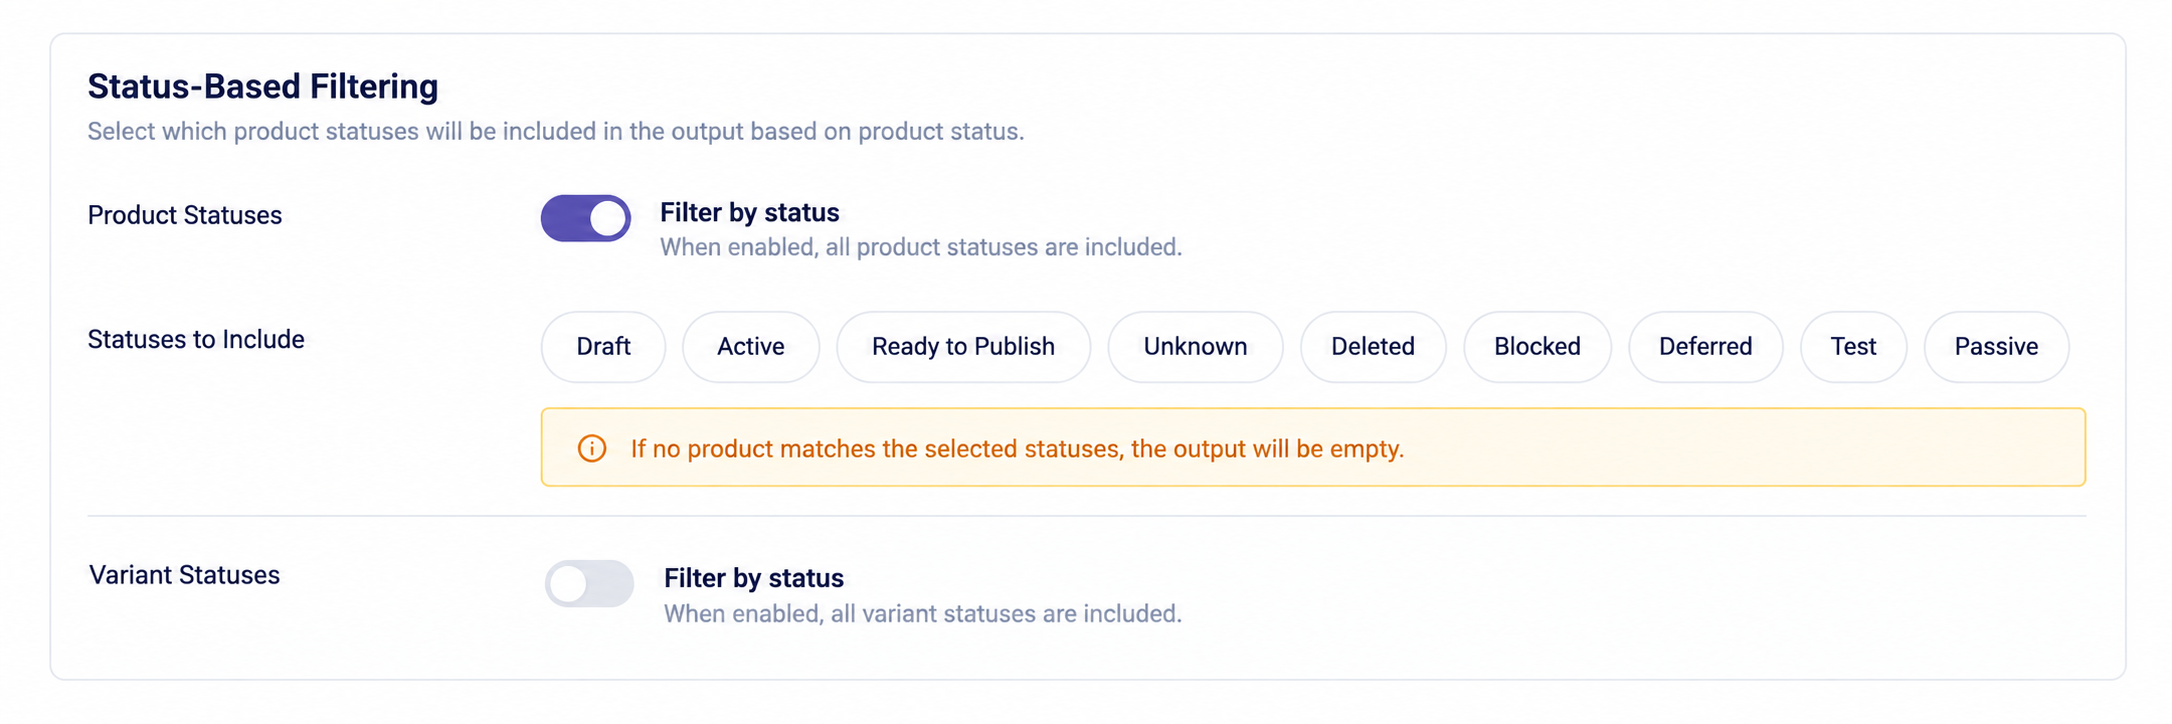
Product and variant statuses can be filtered separately.
When status filtering is disabled, all statuses are included in the feed.
When status filtering is enabled, the Included Statuses field becomes active and you must select the statuses that should be included.
Only products or variants with the selected statuses are included in the feed output.
Filters allow you to limit the records included in the feed according to specific criteria.
Selected filters are evaluated together, and only records matching the defined criteria are included.
The Data Package section determines which data packages are included in the feed output.
Selected data packages are included in the generated output.
How to Map Product Fields to Feed Fields?
Field mapping operations are performed in the Formats & Preview tab.
The Usage Rules and Tips section at the top of the page provides guidance about the rules that should be considered during the mapping process.

Field mapping operations are performed through the Mapping Area.
When creating a feed, you define not only which data will be transferred, but also the hierarchical structure in which that data will be created in the external system.
This structure consists of:
First, create the data structure, then add the fields that will be transferred into that structure.
Group actions are used to edit the structure of the feed output.
When using a predefined template, these structures are generally created automatically by the system.
When using Manual Configuration, these actions are used to create the feed structure from scratch.
Group and Subgroup Structure
A group represents the top-level data structure of the feed. Each group creates a node in the output and contains its subgroups or fields.
Use Add Group to create a new group.
After creating a group, you can:
The group is created only once. This is commonly used for top-level groups such as rss, channel, feed, or root.
The group is created once for every product included in the feed. If the feed contains 100 products, this group is repeated 100 times.
The group is created once for every product variant. For example, if a T-shirt has S, M, and L variants, all three variants are listed separately.
<products>
  <product>...</product>
  <product>...</product>
</products>
In this example, <products> is the outer
Container tag and <product>
is the repeating Item tag.
For repeating group types, Container and Item tag names are generated automatically by the system and can be customized when necessary.
A subgroup is used to organize different related data types hierarchically under an existing group.
A product can include images, documents, categories, brands, properties, and variants.
These related data types are organized under the product using subgroups.
ℹ️ If the created group is Non-Repeating, one of the following types can be selected for the subgroups added under this group:

ℹ️ If the created group is Product List, one of the following types can be selected for the subgroups added under this group:

ℹ️ If the created group is Variant List, one of the following types can be selected for the subgroups added under this group:

A field represents a single data value included in the feed output. It is added inside a group or subgroup and determines how a Lidia PIM system field is transferred to the external system.
Each field consists of two parts:
If Product > Name is selected as the system field
and title is defined as the output field,
the product name is generated as title in the output.
In addition to product, variant, and other system fields, you can add fixed or system-generated values through Custom Values.
A manually entered fixed text value. The same value is written to the output for every record.
Allows automatically generated system information to be added to the output.
Static Value and System Value can be used not only when creating fields, but also when defining Node Attributes.
Which System Fields Can Be Used by Field Type?
To add a field to a Product List group, click Add Field. In the opened window, select the Lidia PIM system field on the left and define the name that will be used in the feed output on the right.
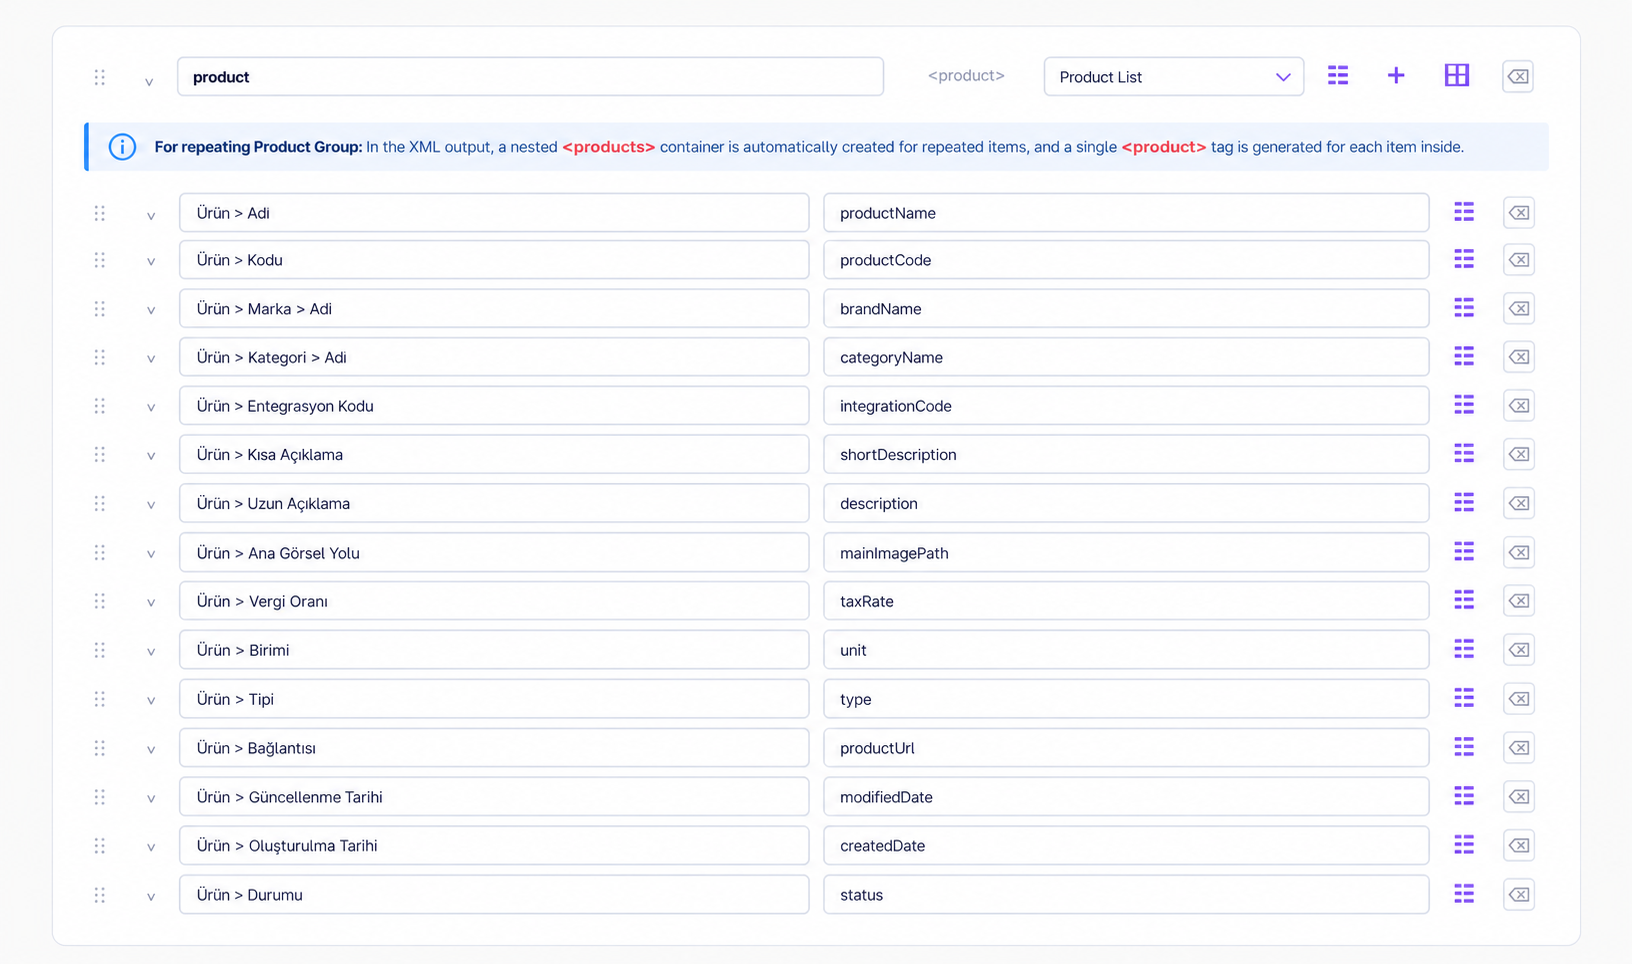
After defining product fields, add subgroups to include related data such as variants, images, documents, categories, brands, and properties.
To include variant information in the feed, create a Variant List subgroup. Then click Add Field to select variant system fields.
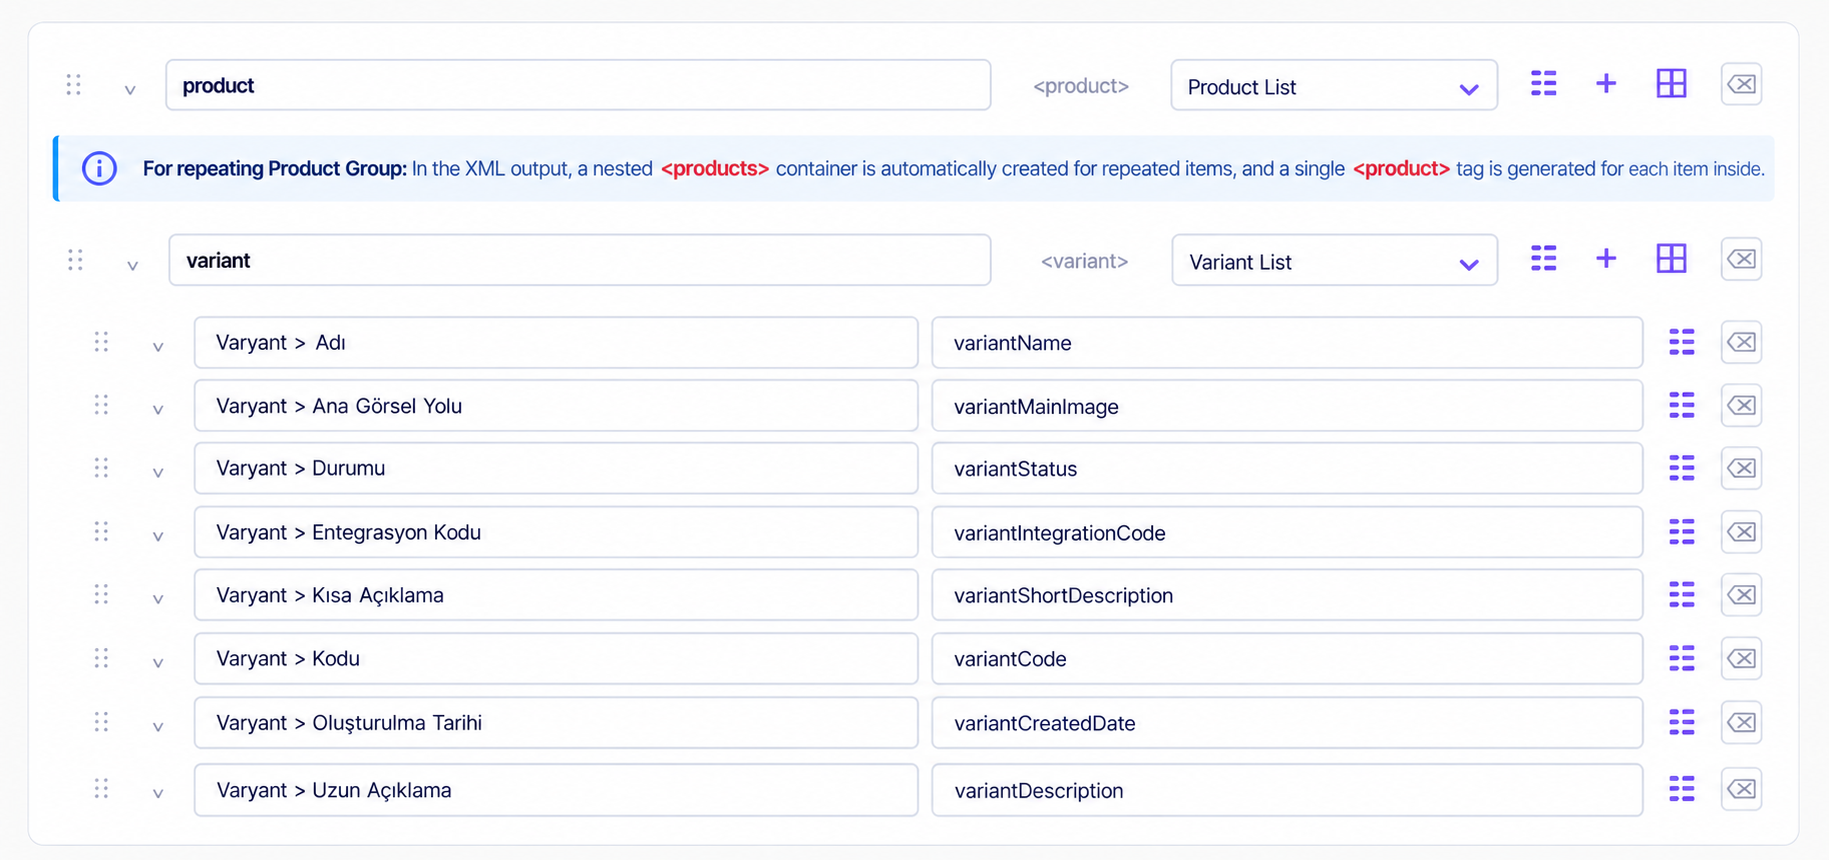
Images and documents under a variant are automatically filtered using the variant's unique code. If no variant-specific media exists, the system automatically lists the main product's images and documents.
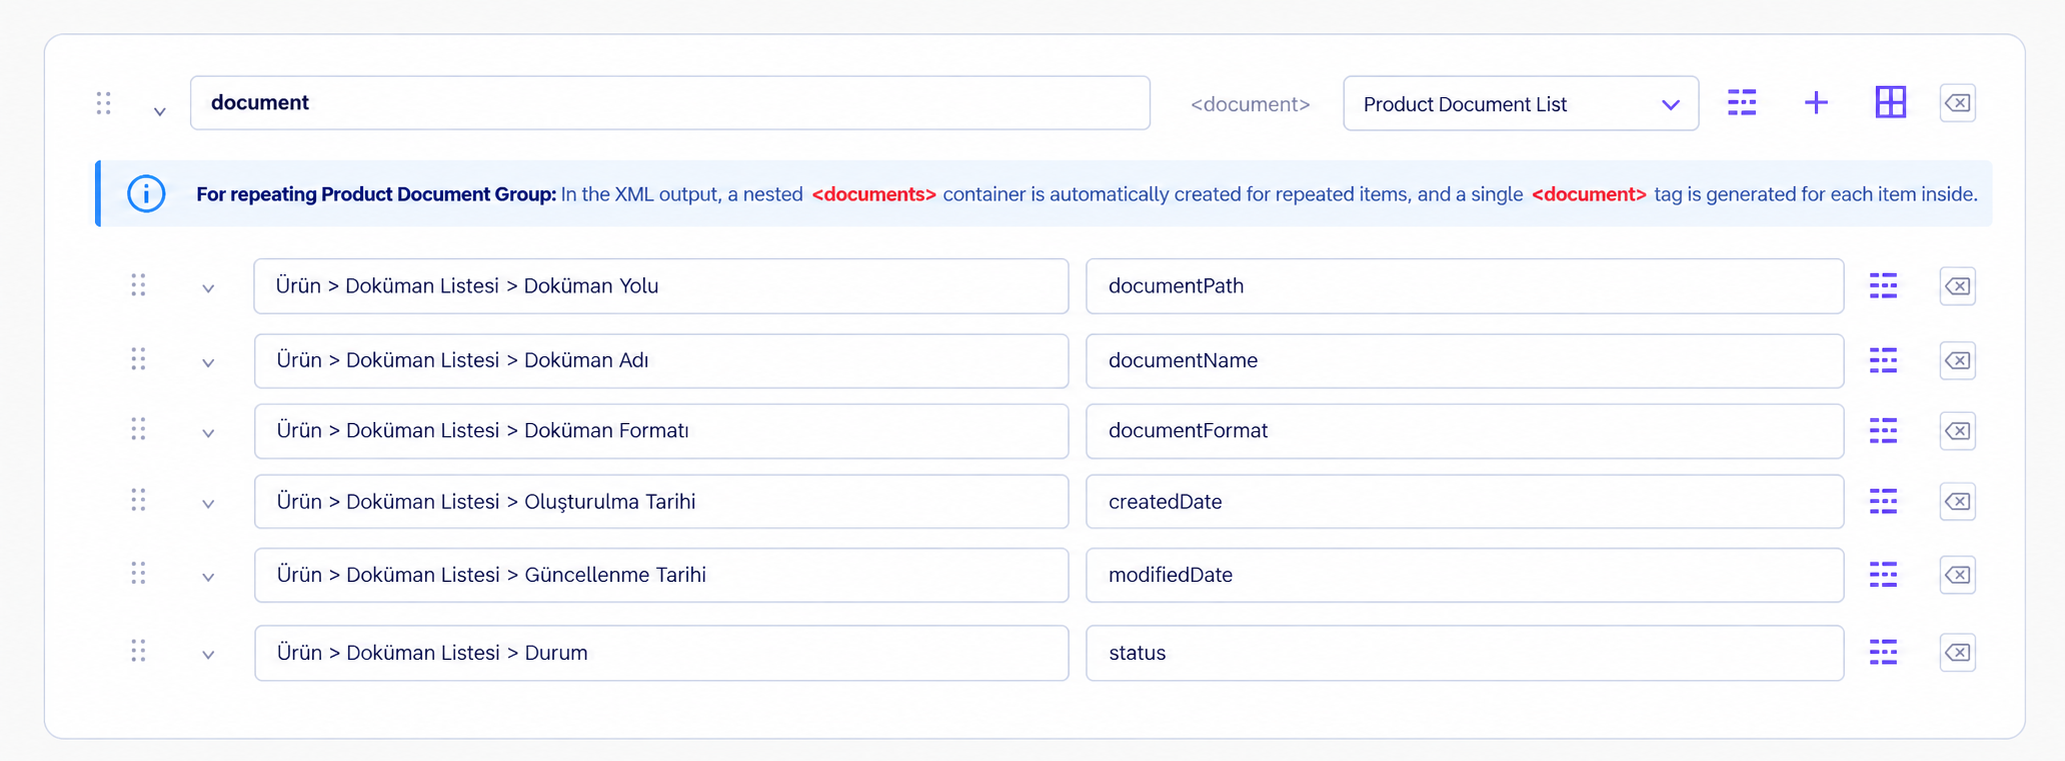
To include product document information in the feed, create a Product Document List subgroup. Then click Add Field to select document fields.
To include product image information in the feed, create a Product Image List subgroup. Then click Add Field to select image fields.

To include product category information in the feed, create a Product Category List subgroup. Then click Add Field to select category fields.

To include product brand information in the feed, create a Product Trademark List subgroup. Then click Add Field to select trademark fields.

To include product property information in the feed, create a Product Property List subgroup. Then click Add Field to select property fields.

To include product option information in the feed, create a Product Option List subgroup. Then click Add Field to select option fields.
 What Are Attributes & Default Values?
After creating a group or field, use the Attributes & Default Values panel to make the feed output more flexible.
This section allows you to:
These capabilities are especially useful when an external system expects a specific XML structure or fixed values.
Node Attributes are used to add XML attributes inside XML tags.
For example:
<rss version="2.0"
     xmlns:g="http://base.google.com/ns/1.0">
In this example:
For this reason, required Node Attributes are predefined in certain templates such as Google Shopping.
A Default Value is used when the corresponding source field in Lidia PIM is empty.
If the product short description is empty, a value such as Description Not Available can automatically be written to the output.
Default values are displayed only when the selected source field is empty.
In collection groups such as Image, Document, or Option, attributes can also reference other fields belonging to the same collection item.
XML tag names can be customized according to the schema expected by the external system.
For a Non-Repeating group, only the Item Tag field is displayed.
For Product List, Variant List, and other repeating collection types, two fields are displayed:
<products>
  <product>...</product>
  <product>...</product>
</products>
Alternative structures can also be created, such as:
Changing XML tag names affects only the generated XML output. It does not change the Lidia PIM data structure or field mappings.
How to Configure Field-Level Attributes & Default Values?
After adding a field, click Manage Attribute and Default Value next to the related field.
The following settings can be configured:
Add XML attributes to the related field.
Defines the value used when the source field is empty.
Prevent specific field values from being used in the generated feed output.
Example blacklist values:
This is useful for preventing invalid or meaningless values from being transferred to the external system.
Value Replacers allow selected source values to be transformed only in the generated feed output.
These transformations are applied only while the feed is generated. The original data stored in Lidia PIM is not changed.
How to Run and Share a Feed with External Systems?
After feed settings and field mapping are completed, the feed can be used by external systems.
When the feed is requested, the system prepares the selected product data according to the configured settings and creates links in different output formats. In Lidia PIM, feed output can be used in JSON, XML, and CSV formats.
Example URL:
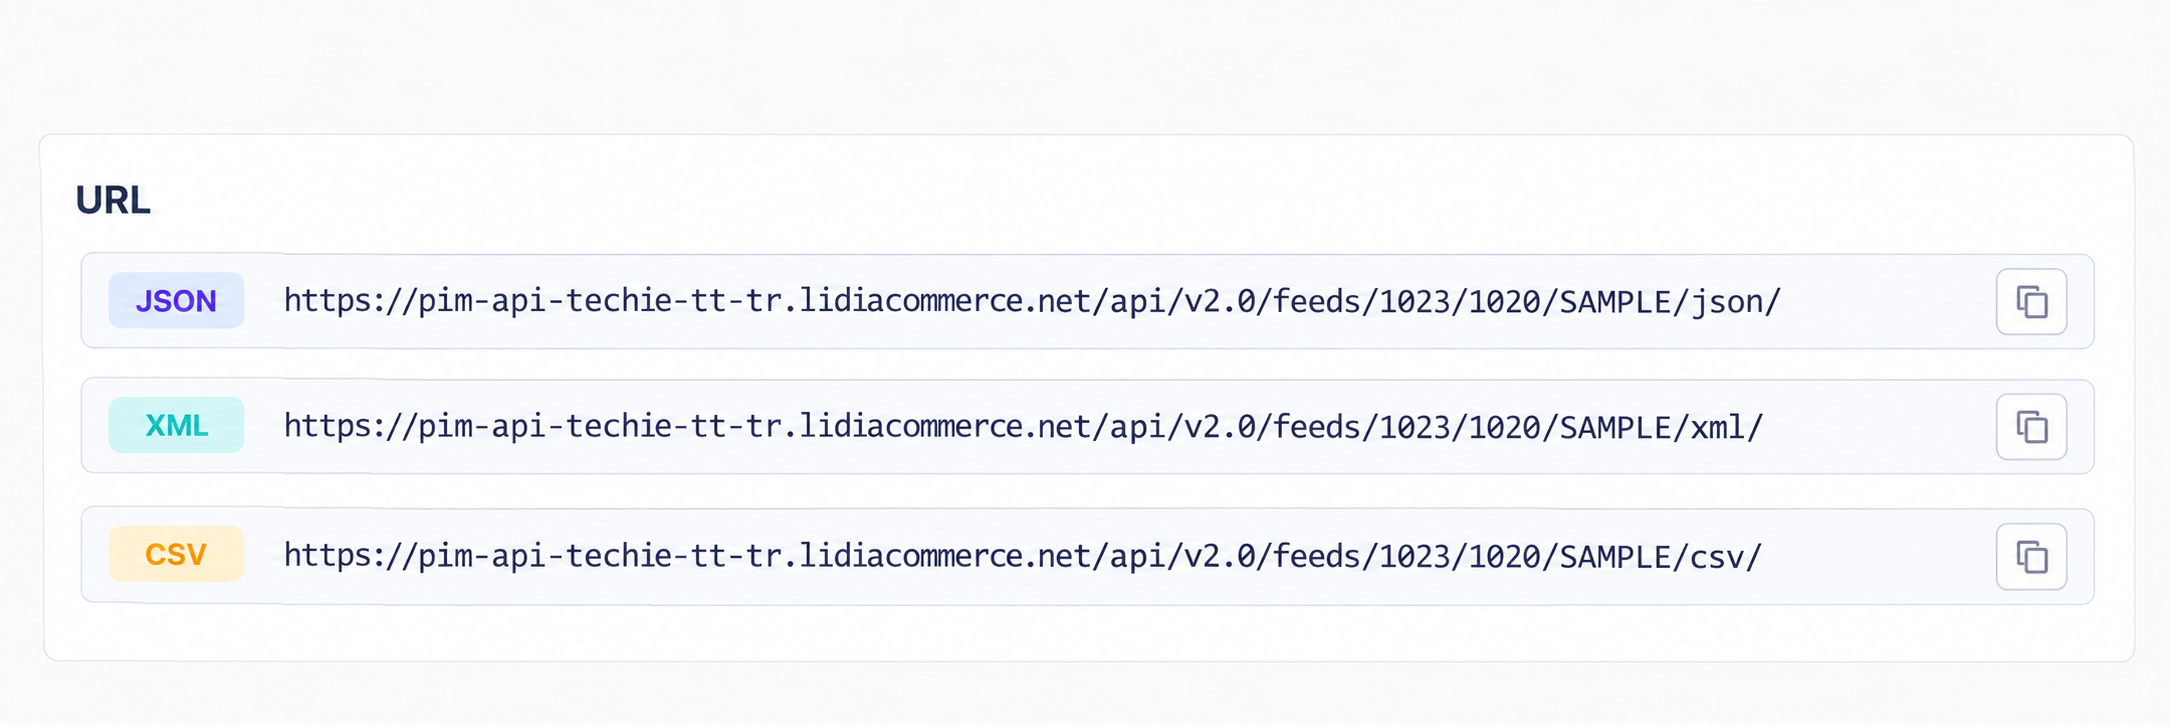
Copy the link corresponding to the format supported by the target system and add it to the relevant platform or use it within your integration process.
Example Output:
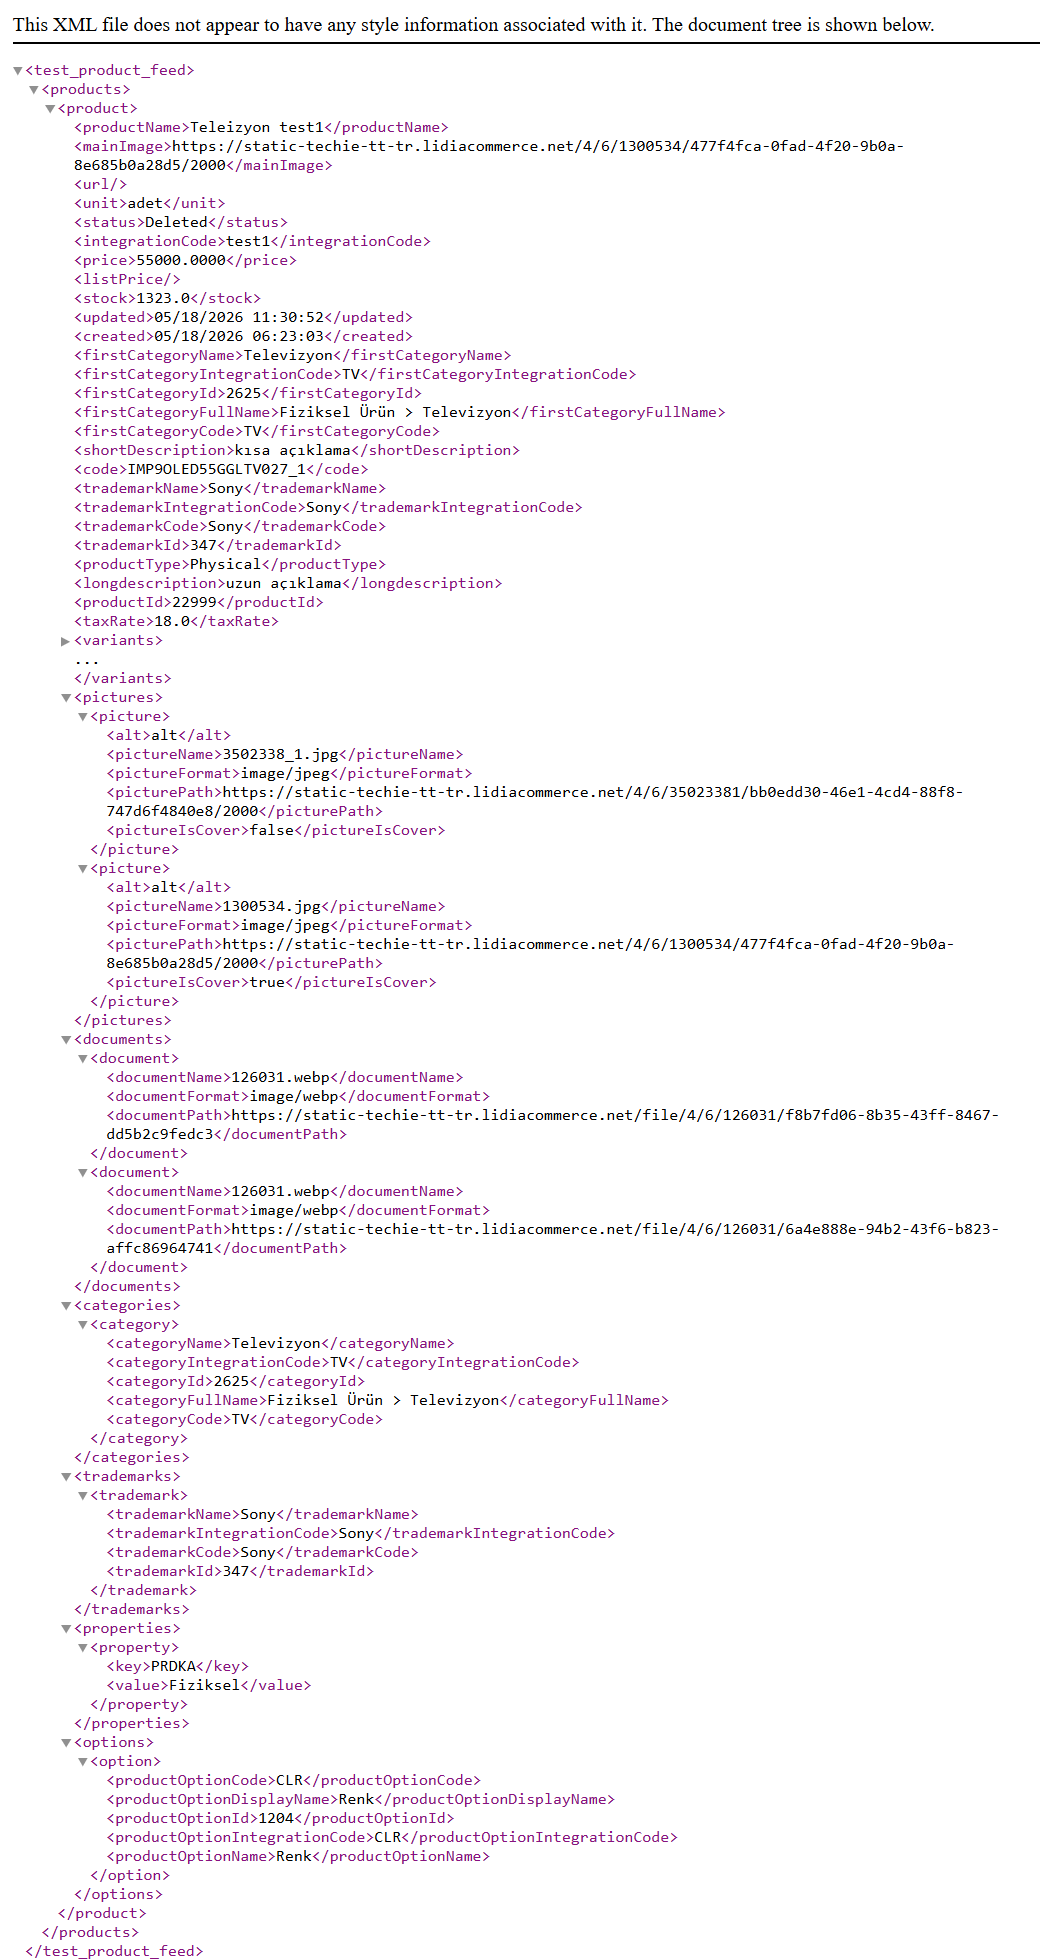
B